Tuesday, November 18, 2014

How I sew darts, the nice n' easy way

Having made umpteen million test fit muslins (seriously. 20 years worth, still working on it), I have come up with a fast and accurate method for sewing darts. This works for the regular pointed dart like a shoulder or bust dart, as well as the double pointed 'fish eye' dart. 
For this method to work, you'll first need to mark the center stiching line on your machine. I drew mine with a fine sharpie, but you could mark it with a sticky note. 

Next you will need to mark the dart. To do this, use two small clips for the dart ends and a small drill hole 1/2 inch from the dart point. To mark the drill hole, use a machine needle and poke through the two layers of fabric. You do this a half inch away from the dart end because otherwise the hole might show through. 


Next align the marked ends of the dart together,and fold dart along the dart fold line, marking with a pin at a half inch past the drill hole. 

Next sew the dart, but here is the trick:
Sew the dart aligning the end of the dart with the center sewing line. 
Keep sewing, watching the pinned end of the dart and making sure it falls exactly on the center sewing line. 

Finish by stitching exactly to the end of the dart. Then stop with the needle down. 

Then lift the presser foot and rotate the fabric 180 degrees and sew a few stitches along the previous stitching line 

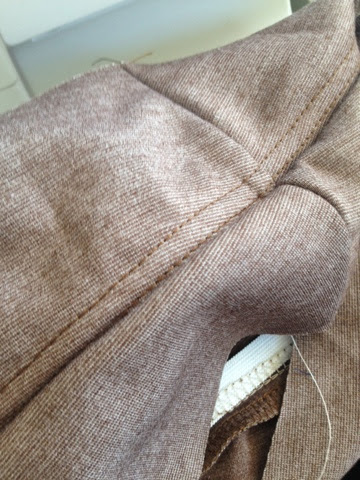
The finished project, shown from the other side, where I had marked the dart lines to show how accurate this method is. 

Thursday, June 5, 2014

Hidden elastic in a yoga pant-style waist band - snaps back wash afterwash!

The finished inside of a yoga paint-style waistband 
I've been sewing the Colette Mabel skirt - a great little pattern that sips fabric and feels just right. It has a yoga-pant style waist band. The fit is accurate, but I did notice the band stretched out a bit as I wore it. Wearing yoga pants while sewing the skirt, I realized my yoga pants waist seam never stretches out and has a nice, snap back sensation.  I could feel a 1/2" band of elastic at the top of the waist band, and noticed on the waist band facing there is a double row of top stitching, which I assume is actually a cover stitch attaching the elastic underneath. I did some searching for how to do this technique, but came up empty. After a bit of trial and error, mostly error, I decided to dissect my yoga pants and discovered how simple the technique is. I've outlined it below.


1: Sew waist band side seams and waist band facing side seams.
2: Right Sides Together, sew waist band to facing at top, using serger if possible.
3: Cut 1/2" elastic the size of your waist, then remove 1 1/2". Butt the short ends together and stitch together using a wide zig zag. Mark the elastic  at center back, center front, and both side seams.
Inside of waist band, elastic coverstiched to facing
4: Open the waist band wrong side up, with seam allowances to the left and the "public" side to the left.
5: Align the elastic along the facing seam, and pin at CB, CF and side seams of the facing.
6: If you don't have a cover stitch machine, simply zig zag the elastic, stitching to the waist band facing piece, being careful to keep the elastic butted up against the top seam (see picture). If you have a cover stitch, turn the whole thing right side up and stitch along the waist band facing, 1/8th inch from the top seam and careful to keep the elastic butted up against the top seam (the elastic will be underneath the facing).
7: Fold the waist band along the top edge, matching the bottom, unstitched edge and press. Baste the bottom edge together. Press as needed.


You are now ready to attach to the skirt.


Saturday, March 1, 2014

Peggy Sagers!


What a thrill to meet a sewing star! I first saw Peggy a couple of years ago when she was the speaker for the annual ASG Expo Banquet. She had such a great wit and great outlook on developing her company.  I purchased her basic blouse, jacket and pants patterns. I'll post the details when I make them! These patterns are part of my new resolution to sew more Independent pattern company patterns. I also am intrigued to learn more industry sewing techniques from Peggy's patterns. Great to meet you Peggy! 

Katrina Walker at Expo!


Tuesday, December 17, 2013

Sewing notions from the hardware store

There is something about a good hardware store. Beyond being the only place one can still buy Chuckles, the hardware seems to have something for everyone, and in my case that everyone is the avid seamstress.
Take my favorite sewing notion: the magnetic dish. Time to toss the old plastic pin holder with the scratches and the crack and the falls-apart-every-time-it-falls feature. It's time to upgrade to this grease-monkey standby. Here's the standard metal version for the purist among us:
 

And a more exciting version in hot yellow so you can't miss it!
 
Look how strong these suckers are! I can even think of a few horizontal surfaces that could benefit from a magnetic holder this strong, like my ironing board.   


My next favorite hardware store sewing notion are the heavy duty spring clamps. I use these to hold down material on the cutting board. Really helpful for straightening the grain. If I have a particularly bad piece of off-grain fabric (like a cheap muslin) I'll use several of them to clamp down each side and stretch the grain into submission. For well-behaved fabric, I use them to hold the salvage end while folding over the length for layout and cutting.

I made good use of these handy small-hand sized wire cutters and pliers when taking Gertie's Bombshell dress class from craftsy.com:

They are small enough to easily snap each side of spiral steel boning (yup, they really do "spring" apart!). If you get big honking wire cutters you just don't have the dexterity to cut a single rung on the spiral steal. These do the trick.

And last but not least, a small box cutter is THE BOMB for ripping out stitches and cutting button holes. If it dulls just snap off a segment and you have a new sharp tool that works much better than a standard seam ripper.  I even it to nip threads.

Tuesday, December 10, 2013

And away I sew!

One of the reasons I've been ambivalent about starting my own sewing blog is that I couldn't think of a catchy name. Then, just a few minutes ago, while updating my profile on patternreview.com, I used the phrase 'and away I sew!' when describing my fitting eureka moment. Here's the full profile post on Pattern Review:

"I started sewing in High school, desperate to make something that would fit my lanky 5'11" frame. My first project was a teal skirt (this was '84). It was bad, but that's when bad was good.  Since then I have sewn for companionship (I used to travel for a living and so did my sewing machine), for family (my niece and nephews have some cool costumes), and for love (men's button downs, and I finally found a keeper). For a while I stopped sewing out of fit frustration, my greatest barrier: shirts that ride-up the front of my neck. This was a constant consternation for me. I had a fitted sloper, so it wasn't a bust issue (I'm a D so have done plenty of FBAs), so I shied away from most patterns and resigned myself to wearing camis and turtle necks. But then I bought Kathleen Fasanella's book and her section on improving product rocked my fitting world. In just one sentence I understood my fit issue. Since then I simply make a small adjustment to the CB neck height of any pattern and away I sew!

So hello fellow sewing enthusiasts! My intention for this blog is probably similar to the rest of the sewing community's: to document specific techniques I like so I can easily refer to them for future projects. I hope my contributions are helpful to others as well.

Happy Sewing!
Leah