 |
| The finished inside of a yoga paint-style waistband |
I've been sewing the Colette Mabel skirt - a great little pattern that sips fabric and feels just right. It has a yoga-pant style waist band. The fit is accurate, but I did notice the band stretched out a bit as I wore it. Wearing yoga pants while sewing the skirt, I realized my yoga pants waist seam never stretches out and has a nice, snap back sensation. I could feel a 1/2" band of elastic at the top of the waist band, and noticed on the waist band facing there is a double row of top stitching, which I assume is actually a cover stitch attaching the elastic underneath. I did some searching for how to do this technique, but came up empty. After a bit of trial and error, mostly error, I decided to dissect my yoga pants and discovered how simple the technique is. I've outlined it below.
1: Sew waist band side seams and waist band facing side seams.
2: Right Sides Together, sew waist band to facing at top, using serger if possible.
3: Cut 1/2" elastic the size of your waist, then remove 1 1/2". Butt the short ends together and stitch together using a wide zig zag. Mark the elastic at center back, center front, and both side seams.
 |
| Inside of waist band, elastic coverstiched to facing |
4: Open the waist band wrong side up, with seam allowances to the left and the "public" side to the left.
5: Align the elastic along the facing seam, and pin at CB, CF and side seams of the facing.
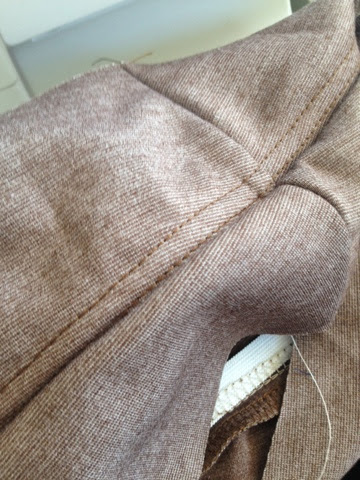 6: If you don't have a cover stitch machine, simply zig zag the elastic, stitching to the waist band facing piece, being careful to keep the elastic butted up against the top seam (see picture). If you have a cover stitch, turn the whole thing right side up and stitch along the waist band facing, 1/8th inch from the top seam and careful to keep the elastic butted up against the top seam (the elastic will be underneath the facing).
7: Fold the waist band along the top edge, matching the bottom, unstitched edge and press. Baste the bottom edge together. Press as needed.
You are now ready to attach to the skirt.

Yes, this is what I wanted to learn! Thank you.
ReplyDeleteFascinating! I must try this. I'm sure it stays nicely in place. Definitely annoying to have elastic floating around at it's own leisure. It was lovely to see you at dinner with Jan Bones on Monday. I really enjoyed our conversations. Let's do get together before the summer is over and sew something fun. Maybe we can collect a few other sewing bloggers. http://www.calmundertension.com/blog.html
ReplyDeleteI just ordered the pattern. I want to sew it, too! You are so inspirational!
ReplyDeleteThank you for sharing this, very clear pictures.
ReplyDeleteUh-oh! It shouldn’t come out though. Thanks for sharing the fix too. I am also looking for a good and comfortable legging for myself as I have started running and going to the gym. Do you think the material has to be different for running and for the gym?
ReplyDelete